John McLaughlin Hexatonic Harmonic minor Guitar Scales Lesson and Explanation
Hi Guys,
Today, a quick look at creating a 6 note Hexatonic scale from the harmonic minor scale.
This works really well on the guitar as the harmonic minor scale is generally a clumpy and awkward affair in regards to the fingering.
So, if we take a look at the Harmonic minor scale in its classic, stock form, we have:
But, for effective guitar fingering, especially on a clean guitar or acoustic guitar this is not the most fluid way for the fretting hand.
So, what to do?
Well, the key is to break it up in the most Shakti way possible:
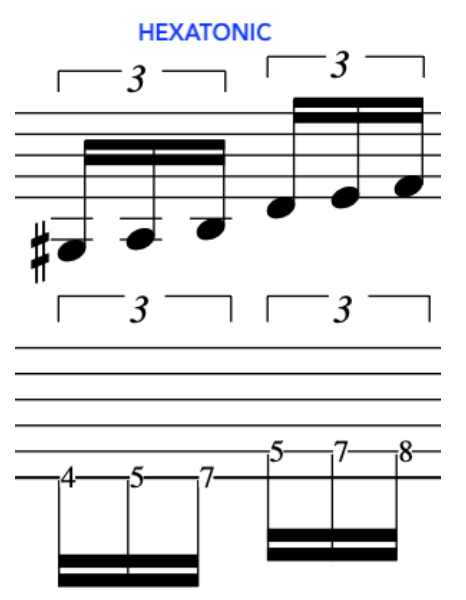
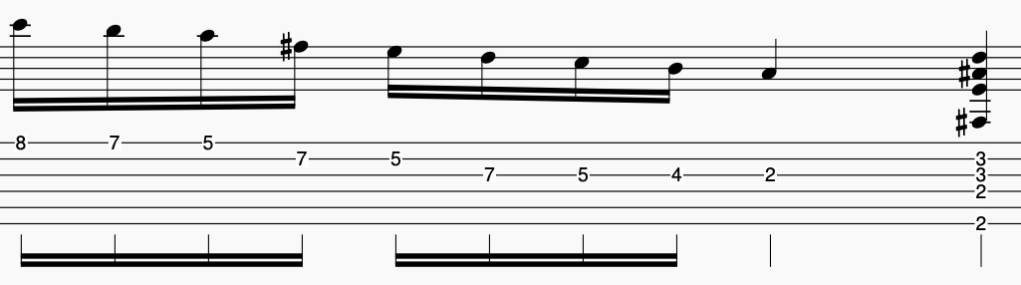
Here’s what we will do: We will employ 6 notes only of the scale. These will be: G# A B D E F
Hexatonic scale diagram with notation showing finger placements for guitar.
This simple 6 note Hexatonic scale gives us an easy 3 notes per string repetitive figure/pattern to alternate pick.
We can now play this across all 6 strings and create a nice line/phrase/scale that is easy to execute, pick and fret.
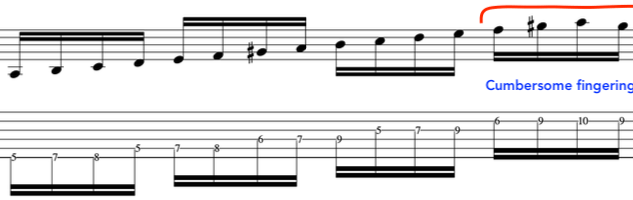
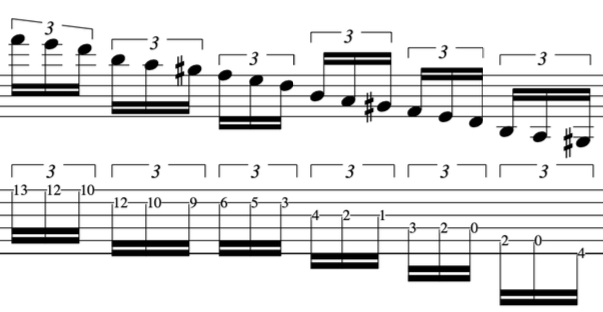
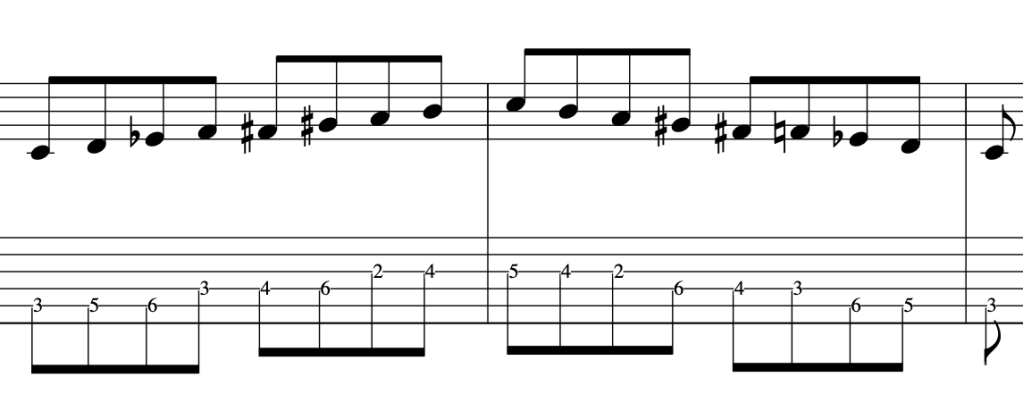
ASCENDING:
Notated example of ascending and descending patterns for the Hexatonic scale on guitar.Hexatonic scale notation for guitar, showcasing ascending and descending patterns.
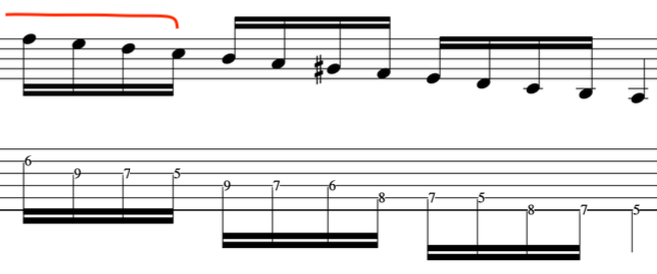
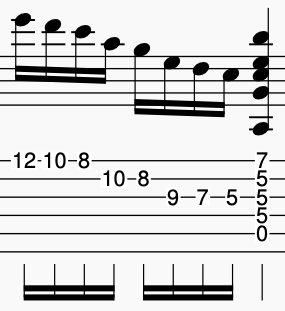
DESCENDING:
Way 1:
Musical notation illustrating the descending pattern for the Hexatonic scale in harmonic minor.
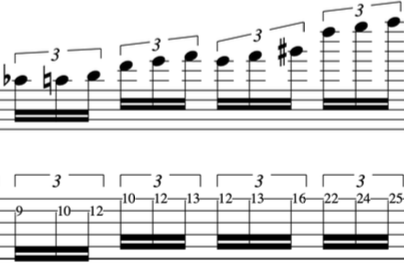
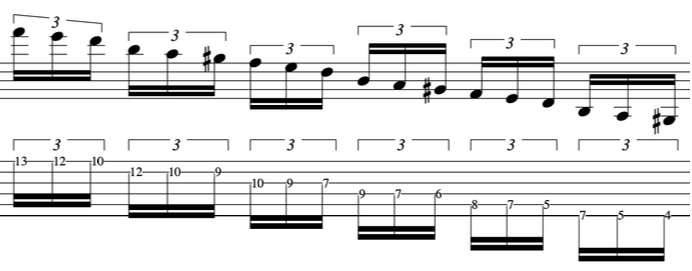
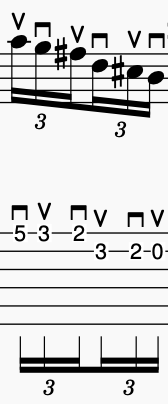
WAY 2:
Notation for the Hexatonic scale, illustrating finger placement and notes on guitar.
In Part 2 we will look at composition and improvisational techniques with the Hexatonic.
Today, a quick look at the fretting hand and fretting notes “Safely”and easily on the guitar.
This is essential to ensure a relaxed hand, relaxed elbow and relaxed shoulders that are aligned and in sync with the right alternate picking hand at uptempo BPM’s.
PART 1:
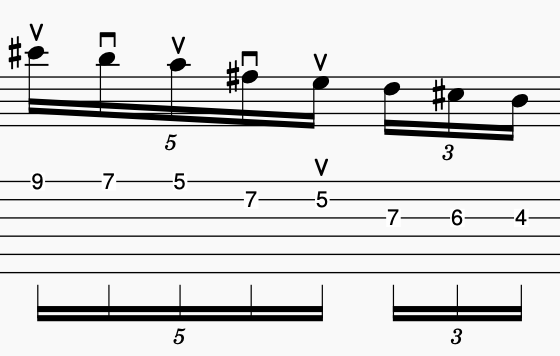
To begin with, let’s take a simple 5 noteprime number pattern and alternate pick it.
This will be done starting on an upstroke.
A guitar sheet music notation featuring a simple 5 note prime number pattern with for alternate picking.
From this simple 5 note pattern, we can move the fretting hand quickly avoiding pressure on the tendons.
Now that we have this let’s add another 3 note prime number pattern.
When these are connected togetherwe have a “Smooth” little phrase of picking and fretting in sync.
Standard music notation for a combined 5 note and 3 note alt pick pattern on guitar.
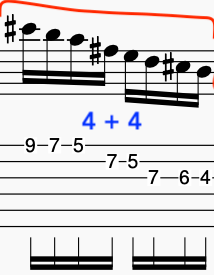
Now, let’s turn the 2 prime number patterns into “Standard” music notation – as 16ths.
Standard music notation for a 5-note prime number pattern as 16ths.
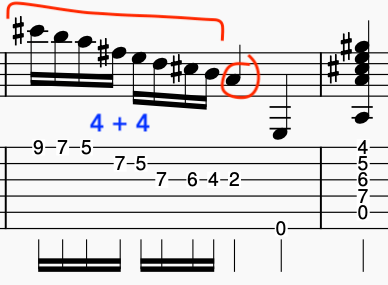
From here, let’s add a chord, so that what we have starts to become/sound like music:
Shakti/McLaughlin style alternate picking technique on guitar
PART 2: Ascending/Descending:
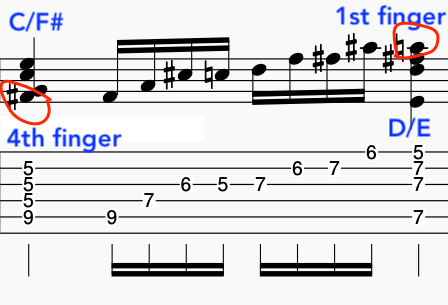
In this example, we will start with a chord and then comfortably play off of that chord ascending and descending into the next chord.
As you can see we have what looks like a bit of a stretch.
But, it is only a barred 2nd inversion C Major triad, with an F# note in the bass on the 4th finger.
The point here is that from that F# note we will start the alternate picking line from that 4th finger as it is already in position.
This makes it easy to do and connect to the next chord as the 1st finger will be in position to play the next chord.
Diagram illustrating the finger placements for the C/F# and D/E chords on guitar like John McLaughlin
The second part then descends nicely into the last chord of F#+7
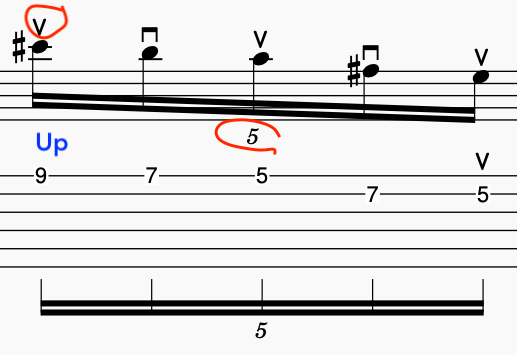
PART 3: Ascending 5
Here, is another group of 5 + 3. Again, this is easy to fret and pick, and as before we will start on an upstroke.
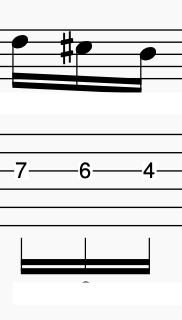
The beauty of this is that when we finish the chord on the downstroke it is natural to then go into the opposite direction and descend into another chord connection.
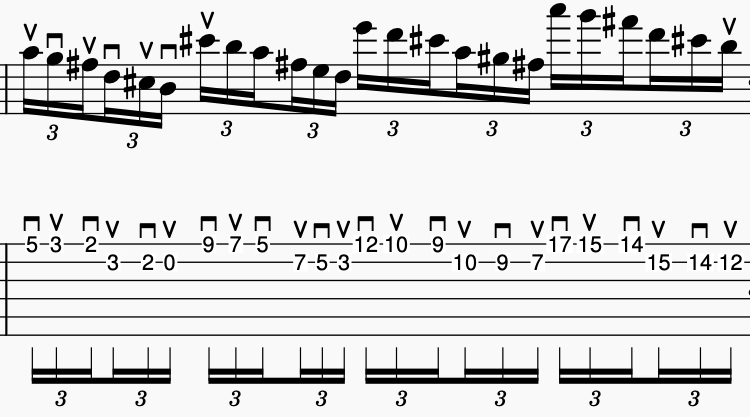
PART 3:Sextuplets.
Finally, let’s finish with a much favoured guitar picking pattern that encapsulates 6 notes [Sextuplets]
We will employ our 5 note prime number pattern and add 1 note.
This will give us a nice and quick 6 note sextuplet pattern to execute.
Now, we will shift this up the fretboard as we repeat it.
Standard music notation for John McLaughlin/Al Di Meola style alternate picking pattern/exercise
IMPORTANT: Please watch video above for detailed info:
Hi Guys,
Welcome to part 2 of the John McLaughlin Modern Jazz Chords series.
First we will have a look at making chords from the whole step half step diminished scale:
The Diminished Scale
Musical notation displaying the diminished scale starting on the note C, for creating modern jazz chords.
Within this scale are lots of Triads: [for instance]
From these Triads we can add different Bass Notes and produce “Slash chords“
Chord progression showcasing slash chords derived from the diminished scale.
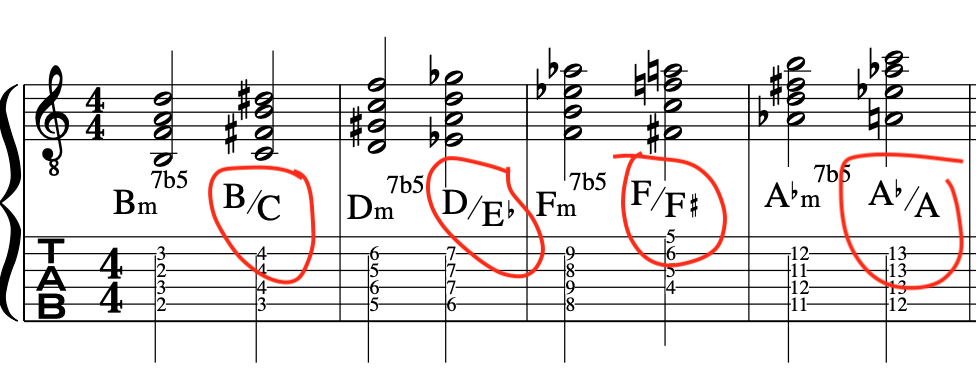
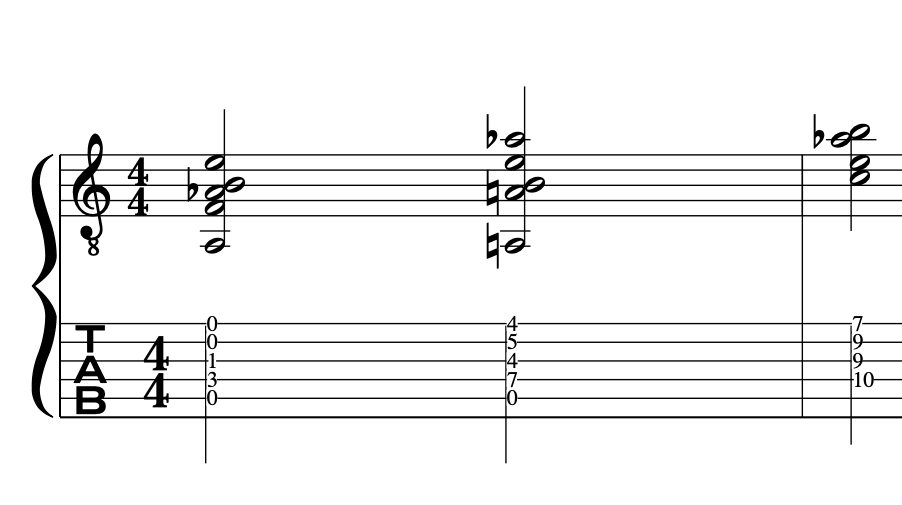
Okay, let’s take three triads with different bass notes and join them together:
Triads with different bass notes from the diminished scale, essential for creating ‘slash chords’ in jazz harmony.
It’s important to realise that because we are employing chords form the diminished scale we have minor 3rd movement.
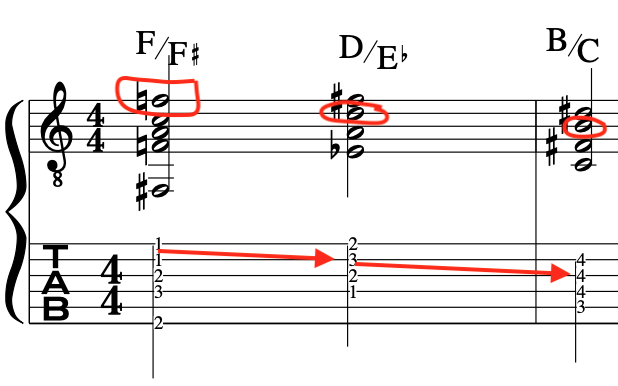
So, let’s add a little melody within the chords: This is the way that John McLaughlin gets that lovely Bluesy feel within the harmony. Again, this is due to the way that the minor 3rd’s work within diminshed scale harmony.
Musical notation showing triad slash chords F/F#, D/Eb, and B/C with finger positions on a guitar tab.
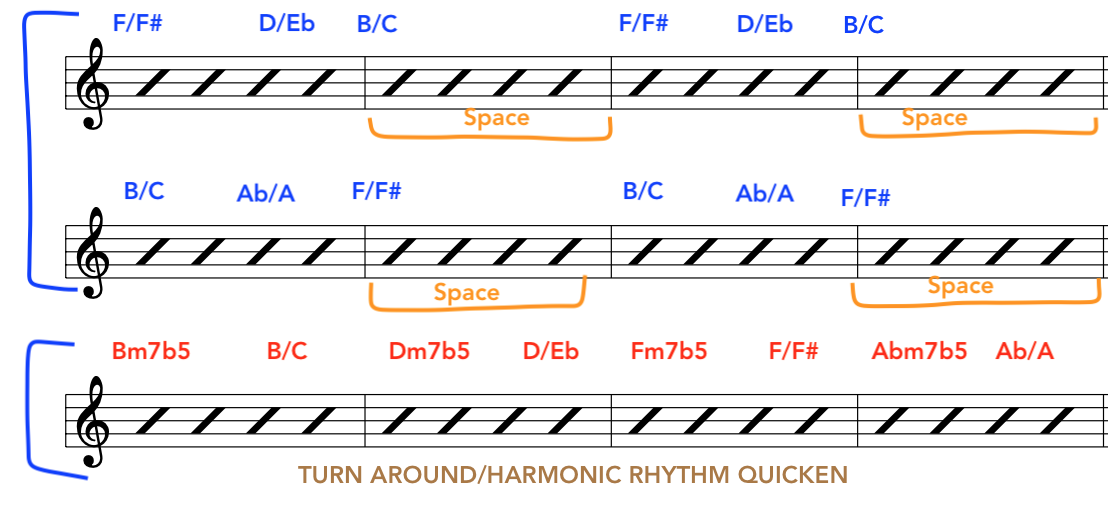
Now let’s create a Blues Composition from this diminished scale.
Chord sequence with diminished scale harmonies for a blues composition.
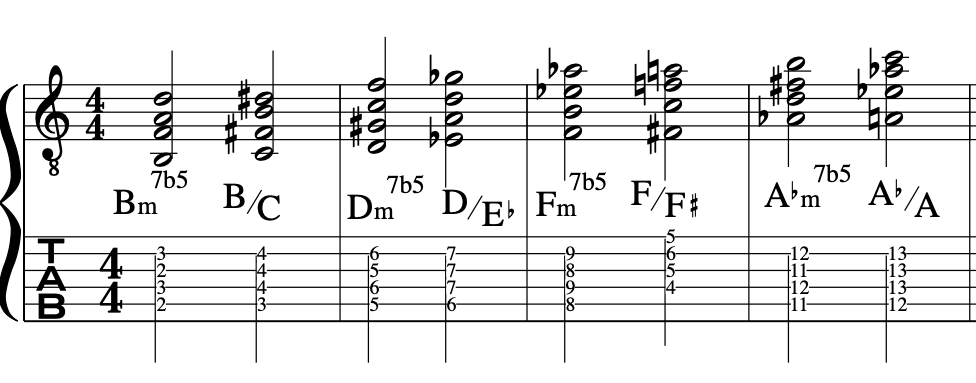
For the last 4 bars we will make the Harmonic Rhythm Quicker by adding a new chord sequence that employs minor7 flat 5’s with slash chords.
Chord progression using diminished scale triads creating slash chords
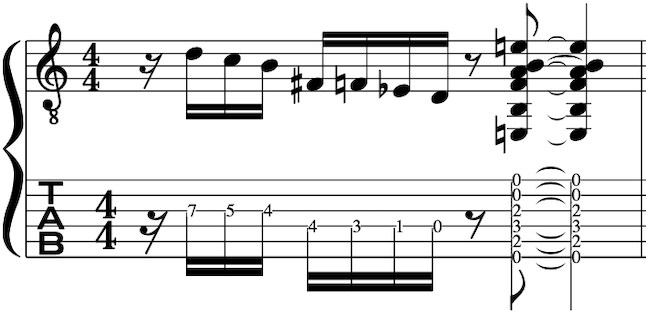
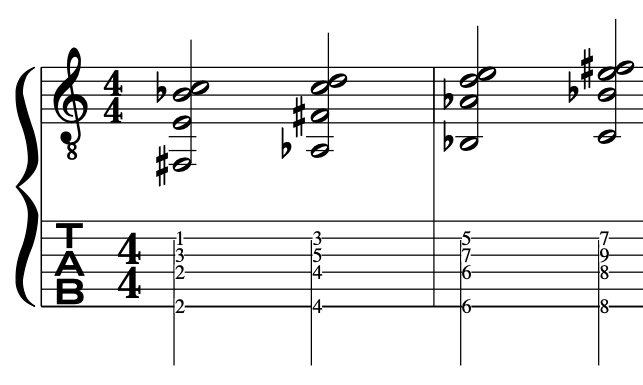
JOING CHORDS WITH SCALIC FRAGMENTS
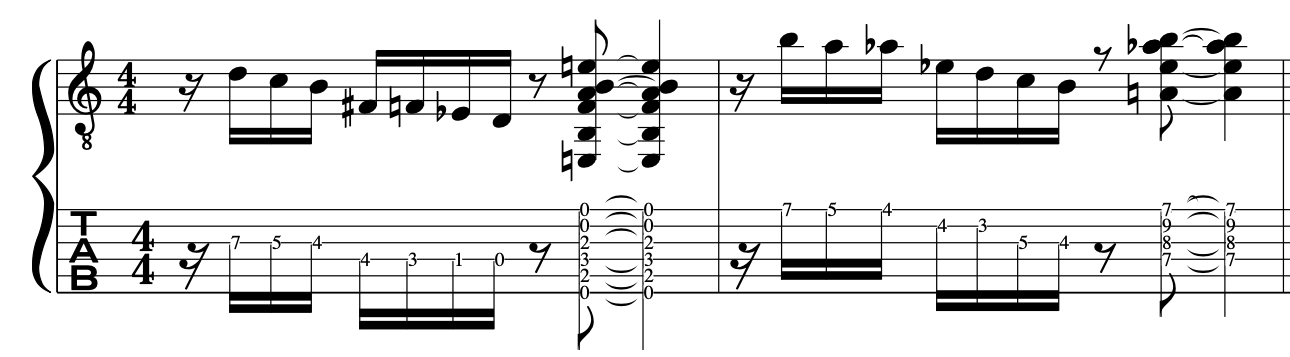
It’s a good idea to join chords together with fragments of the diminished scale: This is also extremely useful when creating composition;
Musical notation illustrating John McLaughlin’s chord scale in a diminished scale context.
2x scale to chords:
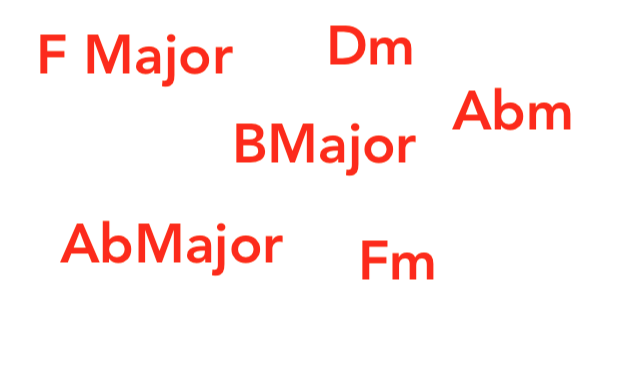
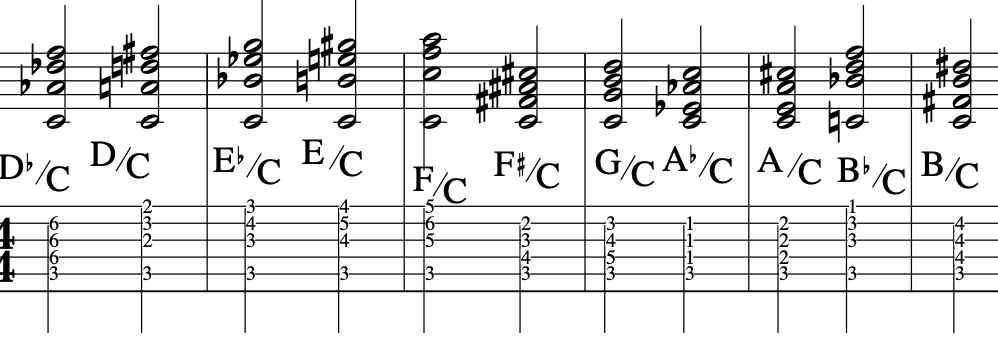
All 12 Major Triads over One Note [C]
Here is an excellent exercise for hearing how all 12 major triads sound over the same single note;
Exercise showcasing all 12 major triads over the pedal note of C.
Lastly, here are some misellaneous John McLaughlin guitar chords:
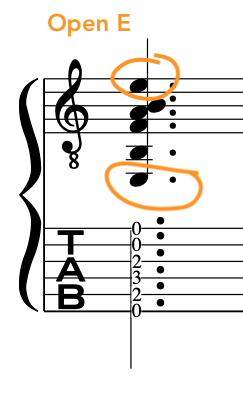
Shakti Chord:
Diagram showing guitar tablature and notation for the Open E “Shakti” McLaughlin chord
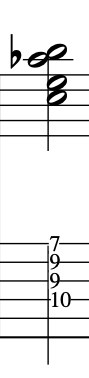
Harmonic minor scale chords:
Example of harmonic minor scale chords for guitar, showcasing the E/A chord.
E/A
Guitar chord diagram for slash chord E/A, illustrating finger positioning and fret numbers.
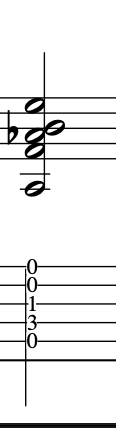
E/C
Musical notation for slash chord taken from the harmonic minor scale.
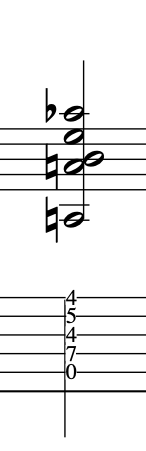
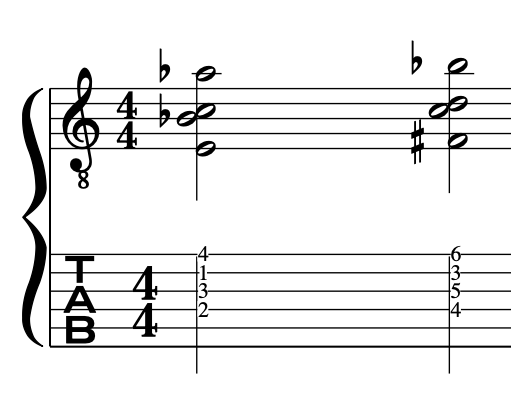
Lastly, From the Whole Tone scale [Notice: 1 tone movement]
Musical notation example featuring chords from the whole tone scale..Musical notation demonstrating John McLaughlin’s slash chord sequences